
How to Add Company Identification to Your Product in Minutes
Add tracking, call an IP-to-company API, and display firmographic data in your product to convert anonymous B2B visitors into qualified leads.

Key Steps:
Set Up Your Account: Sign up on LeadBoxer, generate an API key, and create a dataset for tracking.
Add a Tracking Script: Insert LeadBoxer’s script into your website’s HTML to collect visitor data.
Use the API: Retrieve company details from visitor IPs with simple API calls.
Integrate Data: Display company insights in your product or CRM for actionable results.
Why It Matters:
98% of B2B SaaS website visitors stay anonymous, but real-time identification tools can reveal high-value prospects.
Companies using these tools report 68% more qualified leads and 45% shorter sales cycles.
LeadBoxer’s credit-based pricing makes it easy to start with 25,000 free credits, and integration can be completed in days. Whether you’re a small team or a large enterprise, this system helps convert anonymous traffic into actionable insights, driving pipeline growth and sales efficiency.
The Visitor Identification Strategy Everyone Gets Wrong
What You Need Before You Start
Getting started with LeadBoxer is quick and straightforward - account setup takes less than 2 minutes. Here's what you'll need to get everything ready for integration:
Setting Up Your Account and API Key
First, head over to leadboxer.com/register and sign up. Once you've registered, verify your email to access your dashboard. From there, go to Settings > API Keys to generate your unique API key. This key is essential for authenticating your requests to LeadBoxer, so make sure to copy it and store it securely in your environment variables.
In addition to your API key, you'll also need a Dataset ID. This ID ensures your data is routed correctly for tracking purposes. After creating a dataset in your dashboard, you'll see the Dataset ID, which is tied to that specific dataset. If you’re a SaaS provider embedding LeadBoxer for multiple clients, create separate datasets for each customer to keep their data completely separate.
Once you’ve secured your credentials, take a moment to review the technical requirements to guarantee smooth integration.
Technical Requirements
With your account ready, confirm that your development environment can handle real-time API calls and script modifications. This is crucial for leveraging LeadBoxer’s tracking features.
You'll need developer access to your website’s HTML to insert scripts and make REST API calls. Most modern CMS platforms - such as WordPress, Shopify, or custom-built applications - already support these functions, so you should be good to go.
LeadBoxer’s tracking script is compatible with the latest versions of popular browsers, including Chrome 90+, Firefox 88+, Safari 15+, and Edge 90+. The REST API is also flexible, working with a variety of programming languages like Python, Node.js, PHP, Ruby, and Java. Before you dive in, double-check that your web server, programming language, and CMS platform can handle these adjustments. This step will help you avoid any roadblocks during implementation and make it easier for support teams to assist you if needed.
How to Add Company Identification to Your Product
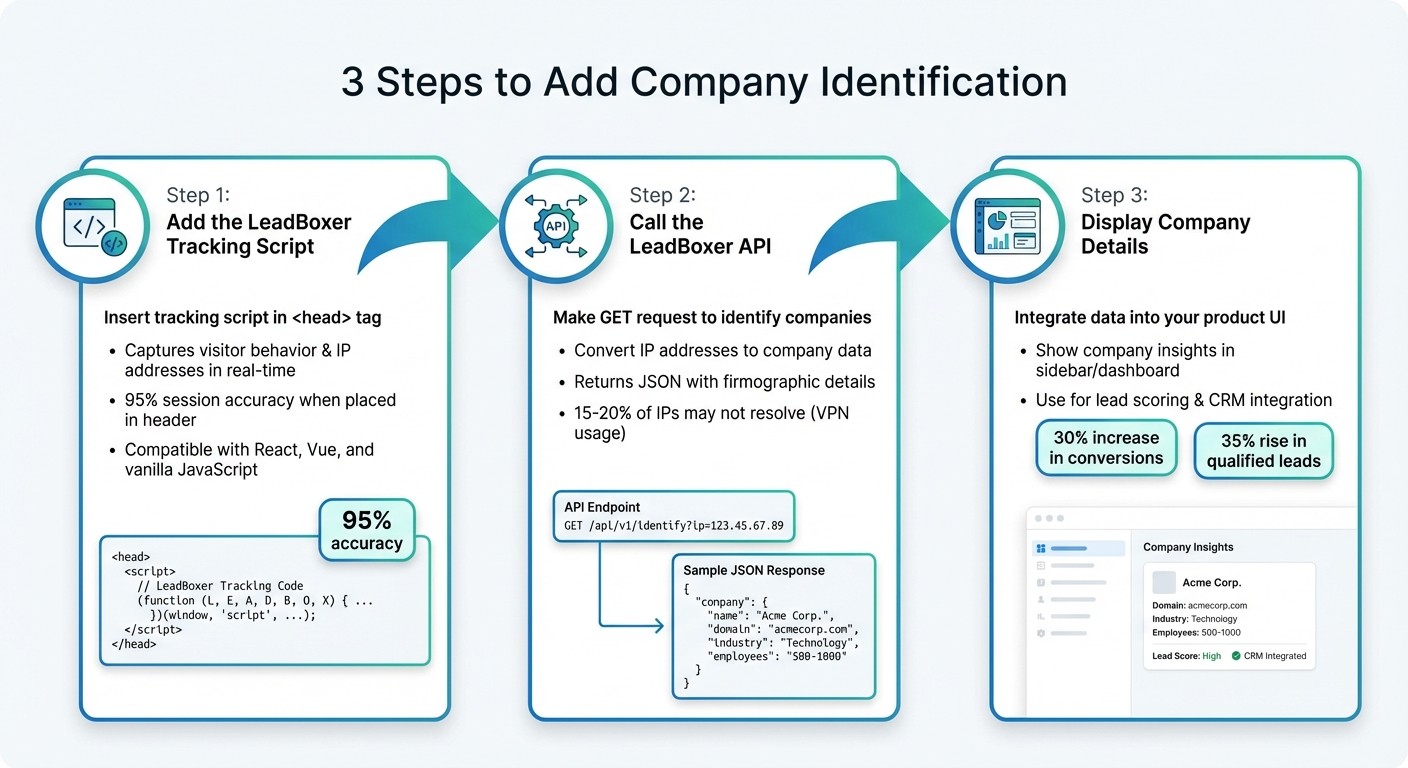
How to Add Company Identification to Your Product in 3 Steps
You can use LeadBoxer’s company identification tools in just three steps. This process helps turn anonymous website visitors into actionable insights, aligning with the goal of increasing qualified leads and improving sales efficiency.
Step 1: Add the LeadBoxer Tracking Script
The first step is to integrate the LeadBoxer tracking script, which captures visitor behavior and IP addresses in real time. You’ll find this script in your LeadBoxer dashboard once your account is set up. It typically looks like this:
Place this script right after the opening <head> tag on your website. This ensures IP capture begins immediately when a page loads, improving session accuracy by up to 95% compared to placing it in the footer. For single-page applications (like those built with React or Vue), add the script in the index.html or app entry point to avoid conflicts with other analytics tools.
The script URL follows this format:
https://script.leadboxer.com/?dataset=YourDatasetId
Here, YourDatasetId is unique to your dataset.
Step 2: Call the LeadBoxer API to Identify Companies
With the tracking script in place, the next step is to use the LeadBoxer API to convert visitor IP addresses into company data. Make a GET request to the following endpoint:
https://api.leadboxer.com/v2/identify?key=YOUR_API_KEY&ip=visitor_ip&userId=session_id
Here’s a breakdown of the key parameters:
key: Your API keyip: The visitor’s IP addressuserId: (Optional) A unique session identifiertimeout: For example, 5000ms for response time
The API responds with JSON data containing firmographic details. Here’s an example response:
Important fields include company.name, company.domain, company.industry, company.employeeCount, company.revenueRange, and company.location.
For React apps, you can trigger the API call when a component mounts using the useEffect hook:
In Next.js, you can make the call in getServerSideProps for server-side rendering or use a client-side effect. For vanilla JavaScript, you might use:
Make sure your API calls are asynchronous (using fetch or axios) to avoid blocking the user interface. Keep in mind that around 15–20% of visitor IPs may not resolve due to factors like VPN usage. For these cases, display "Anonymous Visitor" and log the session. If the API encounters temporary issues, implement retry logic with exponential backoff (up to three attempts).
Step 3: Add Company Details to Your Product Interface
Once you have the company data, you can use it to enhance your product's interface. LeadBoxer provides insights like industry classification, employee count, revenue ranges, location, and technographics (e.g., tools the company uses).
For instance, you could display this information in a sidebar or dashboard widget. Here’s an example setup:
You can also use this data for lead scoring - prioritizing companies with more than 500 employees, for example - or integrate it with your CRM using webhooks to automatically create leads. Studies show that this approach can increase conversions by 30%. For example, a B2B SaaS company that used LeadBoxer identified 40% of anonymous traffic as enterprise leads, leading to a 35% rise in qualified leads and a 22% boost in sales velocity within three months.
Finally, test your setup thoroughly to ensure the data is accurate and the integration works smoothly.
Testing and Monitoring Your Setup
Once integration is done, it’s time to ensure everything works as intended.
Testing with Anonymous Visitors
Start by simulating anonymous visits. Open an incognito or private browsing window in Chrome or Firefox, clear your cookies and cache, and visit your website. This simulates how a first-time visitor interacts with your site.
For a more thorough test, use a VPN or proxy to cycle through different IP addresses. This lets you see how the system handles visitors from various locations and organizations. While on your site, open Developer Tools, go to the Network tab, and check if API calls return the expected JSON data.
You should also test with a known corporate IP address. For instance, if you use a proxy tied to a specific company's network, confirm that LeadBoxer identifies the organization correctly. The goal is an identification rate of over 85% for business IPs. If you run into issues like 404 errors or timeouts, double-check that your API key has the right permissions and that the tracking script is correctly placed before the closing </body> tag.
Once you’ve confirmed the setup is working, review the collected data in your dashboard to assess performance.
Reviewing Data in the LeadBoxer Dashboard
After verifying the API responses, log in to your LeadBoxer dashboard to monitor live visitor data. Navigate to the "Real-Time Data" or "Visitors" tab in the sidebar. Use the MM/DD/YYYY format to filter by date range - setting it to the last 24 hours allows you to view your test visits. The live feed will show company logos, domains, and engagement scores, making it easy to scan for relevant details.
Pay attention to these key metrics:
Identification Rate: The percentage of visitors resolved to companies. For B2B traffic, aim for a rate above 70%.
Data Accuracy Score: This reflects how well the data matches external databases.
Latency: Average resolution time, which should stay under 3 seconds.
You can also analyze engagement insights, such as the number of pages viewed by identified companies, to better understand visitor behavior.
To stay on top of performance, set up automated alerts. For example, configure notifications via email or Slack if the identification rate drops below 60% or if error rates exceed 5%. You can also schedule reports to track key metrics, like identifying 500 unique companies weekly. Regularly auditing your dashboard data against tools like LinkedIn Sales Navigator ensures your setup remains accurate as traffic grows.
LeadBoxer Pricing Plans
After setting up your integration, it's time to explore the pricing options and choose the plan that aligns with your team's needs. The pricing model supports the integrated real-time data enrichment features, ensuring your product delivers actionable insights.
LeadBoxer operates on a credit-based system for data enrichment. Each Persona Lookup (to uncover job titles and names) or Email Lookup (to retrieve verified contact addresses) uses 1 credit per action. Credits are replenished monthly based on your subscription tier and reset at the start of each billing cycle - they do not carry over to the next month.
Credit-Based Pricing Options
The pricing is structured to accommodate different levels of usage. Here's a breakdown of the available plans:
Free Plan: Includes 25 credits per month at no cost, perfect for basic testing or low-volume use.
Starter Plan: Priced at $80.00/month, provides 250 credits, ideal for small teams just starting out.
Basic Plan: Costs $121.00/month and offers 500 credits, catering to small businesses that rely on automation and collaboration features.
Enterprise Plan: Supplies 2,500 credits per month with custom pricing. This plan is tailored for large-scale operations - contact sales for more details.
If you run out of credits before the end of your billing cycle, you’ll need to upgrade your plan, as individual credit top-ups are not available. To avoid disruptions, keep an eye on your credit balance in the Settings or Account Overview section. Additionally, you can take advantage of a 14-day free trial for paid plans, giving you the chance to test data-driven lead targeting models and determine the credit volume that meets your outreach needs.
Plan | Monthly Price | Credits Allocated | Best For |
|---|---|---|---|
Free | $0 | 25 | Testing and minimal usage |
Starter | $80.00 | 250 | Small teams starting out |
Basic | $121.00 | 500 | Small businesses using automation |
Enterprise | Custom | 2,500 | Large-scale operations with premium needs |
For SaaS developers integrating company identification, LeadBoxer also provides a Pay Per Use model. This option starts with the first 25,000 credits free, and costs decrease as usage increases, ranging from €0.0005 to €0.0003 per credit depending on the volume.
These pricing plans offer the flexibility to scale your usage as your business and B2B lead generation efforts expand.
Conclusion
Incorporating company identification into your product doesn’t have to be a lengthy or complex process. With LeadBoxer, you can set up a comprehensive tracking and enrichment system in just a few days - far quicker than the typical 6 to 12 months it takes to build one from the ground up. This efficient approach transforms anonymous website traffic into actionable leads.
This integration brings several advantages: real-time visitor qualification, personalized user experiences and data visualization, and shorter sales cycles. By identifying which companies are interacting with your product, your sales team can focus on high-value prospects, while marketing can craft tailored messages based on factors like company size, industry, and engagement behavior.
LeadBoxer’s credit-based pricing model adapts to your business needs. You only pay for what you use, with costs decreasing as your volume grows - making it suitable for both startups and larger enterprises.
Once the integration is live, it’s important to fine-tune your setup. Use anonymous visitors to test the system, keep an eye on identification rates, and track how leads progress through your pipeline. As your business scales, you can adjust your credit usage without being tied to rigid annual contracts. LeadBoxer takes care of the infrastructure, leaving you free to focus on converting those leads.
"Building your own tracking and enrichment pipeline takes months. Maintaining it takes years. LeadBoxer Platform gives you a complete data layer that you can embed in your product."
FAQs
How do I keep the API key secure in production?
To keep your API key safe in a production environment, make sure to store it in environment variables or secure configuration files - never in client-side code or public repositories. Always use separate API keys for development, staging, and production environments to reduce potential risks. Think of your API key as a password: protect it from unauthorized access or misuse at all costs.
How should I handle visitors on VPNs or shared IPs?
Relying solely on IP addresses to identify visitors can be tricky, especially when dealing with VPNs or shared IPs. These networks often obscure individual identities, making it harder to pinpoint users. To address this, you can take a few steps to improve accuracy: maintain flagged lists of VPN-related IPs, analyze network traffic patterns for unusual activity, or use detection methods to spot VPN usage. By combining these approaches, you can better differentiate real visitor identities, even with the complications caused by VPNs or shared IPs.
What’s the best way to show company data without hurting page speed?
To showcase company data without compromising page speed, it's essential to use smart tracking and enrichment techniques. Start by implementing LeadBoxer's tracking script and handle event submissions server-side. This minimizes the load on the client side. Additionally, retrieve detailed company data asynchronously through APIs, allowing background enrichment tasks like resolving IPs or domains. These methods help maintain quick page loads while delivering comprehensive company insights.
Related Blog Posts

Supercharge your marketing results with LeadBoxer!
Analyze campaigns and traffic, segement by industry, drilldown on company size and filter by location. See your Top pages, top accounts, and many other metrics.


LeadBoxer
Get started