
How to Build a Lead Intelligence Engine Without Building the Infrastructure
Build a lead intelligence engine fast with tracking, enrichment, intent scoring, and CRM integrations—no custom infrastructure.

Sales teams waste hundreds of hours annually on manual lead research. A lead intelligence engine automates this process, transforming raw data into qualified leads in seconds. Here's how it works:
Automates lead research: Tracks behaviors (e.g., website visits, email clicks), enriches leads with company data, scores B2B lead intent, and routes them to CRMs.
Saves time and resources: Pre-built solutions eliminate the need for a 6–12 month in-house build, cutting costs and speeding deployment.
Boosts results: Automation can increase meeting bookings by 40% and reduce manual research by 10+ hours weekly.
Instead of building from scratch, use platforms like LeadBoxer. They handle tracking, enrichment, and scoring while integrating with your CRM in days - not months. Start with a simple tracking script, enrich leads in real time, and prioritize high-intent prospects for immediate outreach. This approach saves time, slashes costs, and keeps teams focused on selling.
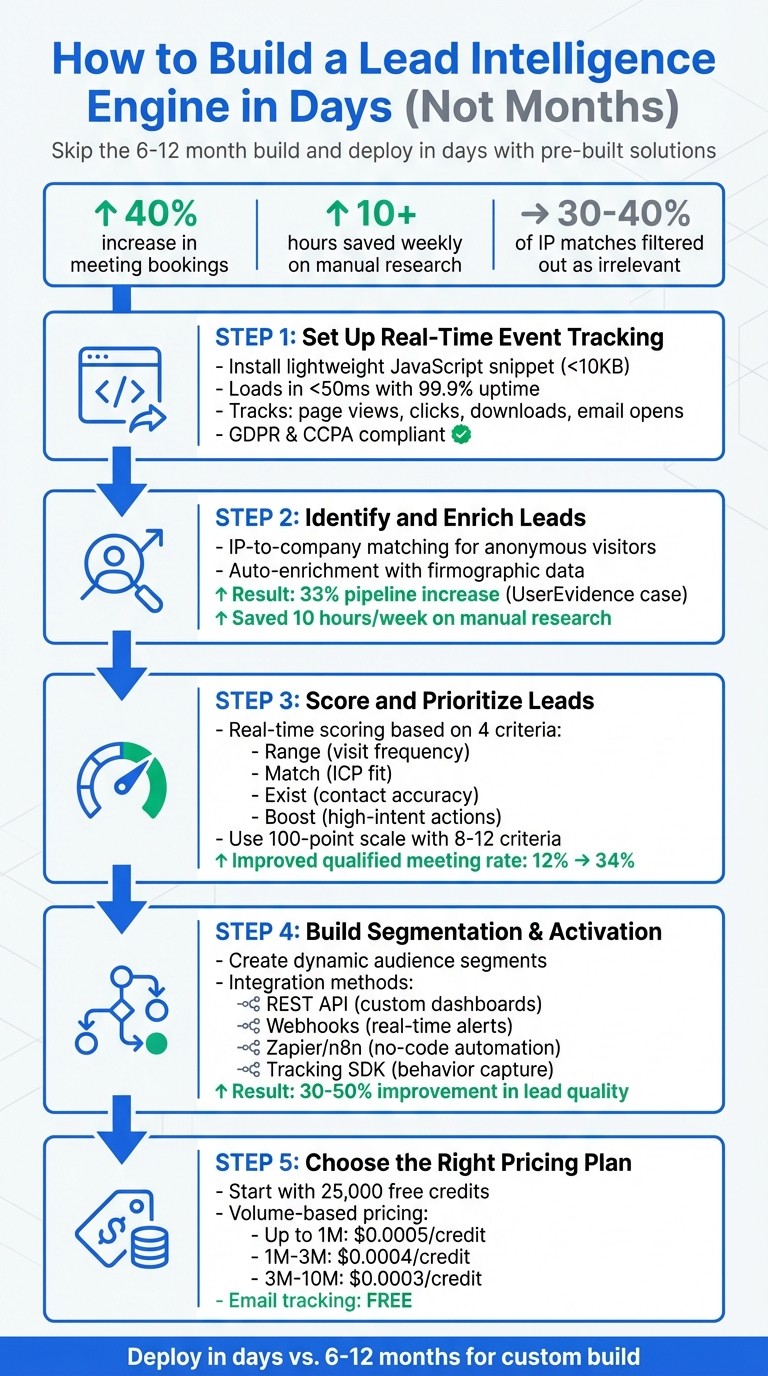
5-Step Lead Intelligence Engine Implementation Process
AI Agents for Real-Time Lead Generation: Tools, Frameworks, & LLMs
Step 1: Set Up Real-Time Event Tracking
Building a solid lead intelligence system starts with capturing visitor interactions on your website and emails. LeadBoxer’s tracking layer collects behavioral data like page views, time spent on pages, scroll depth, form submissions, button clicks, file downloads, and email opens. These signals are crucial for uncovering purchase intent, especially in B2B funnels.
The tracking process uses a lightweight JavaScript snippet, which is less than 10KB and loads asynchronously in under 50ms. This ensures your site performance remains unaffected while maintaining 99.9% uptime and compliance with GDPR and CCPA regulations. Once in place, the data flows into LeadBoxer’s platform in real time, setting the stage for advanced lead identification and enrichment in later steps.
Install the Tracking Script
Start by logging into your LeadBoxer dashboard, navigating to the dataset settings, and copying the provided JavaScript snippet. It will look something like this:
Add this snippet to your website’s HTML so it loads on every page - placing it just before the closing </body> tag is common practice. If your site runs on WordPress, Drupal, or uses Google Tag Manager, LeadBoxer provides dedicated plugins and detailed tutorials to simplify the process. After installation, check your dashboard to confirm that real-time pageviews are being tracked.
To go beyond basic pageviews and capture custom actions - like clicks on a CTA button, demo requests, or file downloads - use the following function:
For instance, if you want to track clicks on a pricing page CTA, you would use:
Additionally, before loading the LeadBoxer script, define the ot_onload() function to include metadata with the initial pageview. This allows you to send extra details, such as account IDs, subscription levels, or user types, directly into the tracking data.
Once the script is up and running, you’re ready to configure event ingestion for real-time data collection.
Configure Real-Time Event Ingestion
With the script live, LeadBoxer begins collecting behavioral data through its API endpoints. Client-side events, like clicks or scrolls, are handled automatically by the JavaScript SDK. For server-side events - such as user sign-ups, subscription updates, or logins - you can send data directly to:
Use GET or POST requests to submit events. Every API call must include your unique dataset ID (si) and an event title (ti) that describes the action, such as "trial_started" or "invoice_paid". You can also include optional parameters like:
uid: User ID for connecting actions to individual users
sid: Session ID to group related events
ip: To override geographic data
Here’s an example of a typical POST request with a JSON payload:
Use tools like Postman to test your API calls before implementation. If you’re sending events from backend systems, enable the proxy=true parameter to ensure the visitor’s IP or user-agent data isn’t replaced by your server’s details.
This real-time event ingestion is the backbone of your lead intelligence system, turning raw behavioral data into actionable insights.
Step 2: Identify and Enrich Leads
Once your tracking system starts collecting behavioral data, the next step is turning anonymous website visitors into qualified leads. Here’s the challenge: most B2B visitors don’t fill out forms. They might check out your pricing page, read documentation, or download a whitepaper without ever leaving their contact details. That’s where LeadBoxer’s identification and enrichment tools step in, bridging the gap by converting IP addresses into company names and adding business context to behavioral data.
This process unfolds in two stages: identifying which companies are visiting your site and enriching those leads with business details like industry, employee count, and revenue range. Together, these steps turn raw pageviews into actionable accounts your sales team can pursue. Let’s dive into how this works, starting with passive lead identification.
Use Identification APIs to Resolve Leads
LeadBoxer uses IP-to-company matching to identify anonymous visitors. This method maps corporate IP addresses to business names, domains, industries, and locations. When someone from a company network visits your site, their IP address is automatically resolved into a company profile - no user interaction required. It’s a seamless way to identify potential leads using passive network data.
But not all IP data is useful. Approximately 30–40% of IP matches end up being irrelevant, such as ISPs, universities, VPNs, or residential addresses that don’t align with B2B sales. LeadBoxer’s filtering system removes this noise, leaving your sales team with verified business accounts. For instance, during a 30-day pilot with a SaaS company, this filtering process boosted the SDR contact rate from 12% to 41%.
Beyond IP matching, LeadBoxer also tracks leads through email link clicks and form submissions. When someone clicks a tracked link in your marketing email, their email address gets linked to their browsing activity, combining anonymous behavior with a known identity. The platform pulls data from multiple channels and merges it into one unified profile.
To improve identification accuracy, focus on high-intent pages like pricing, demos, or documentation. These pages attract visitors who are actively considering your solution, making them much more valuable than general homepage traffic. Configure your dashboard to highlight leads who repeatedly visit these key pages within a short timeframe.
Once you’ve identified your leads, the next step is enriching them with firmographic data to qualify and prioritize leads effectively.
Add Firmographic Data to Leads
Identifying a company is just the start. To make the lead actionable, you need firmographic data - details about the business that help your team qualify accounts. LeadBoxer automatically enriches leads with information like industry, employee count, revenue range, location, and organizational structure, creating a complete company profile.
Why is this important? Without enrichment, knowing “Acme Corp” visited your site doesn’t tell you much. Are they a small startup or a massive enterprise? Firmographic data provides the critical context your sales team needs to route leads appropriately and tailor their outreach. This step transforms raw behavioral data into fully qualified leads ready for targeted engagement.
Take UserEvidence as an example. In early 2024, under the leadership of SDR Manager Amanda Newman, the team integrated firmographic enrichment into their sales process. The result? A 33% increase in pipeline within three months, generating 161 new opportunities. They also saved 10 hours of manual research each week by automating data collection.
LeadBoxer performs enrichment in real time, so your CRM is updated with complete profiles as soon as leads are identified. You can also run batch enrichment on older CRM records to refresh outdated data. This is critical because sales data loses accuracy quickly, and keeping it current helps prevent issues like email bounce rates caused by outdated contacts. The platform also standardizes data formats automatically - for example, unifying entries like “United States” and “US” - to ensure your database remains consistent and easy to search.
Here’s another success story: In Q2 2025, a mid-market data infrastructure company used job postings as a signal to identify prospects. They tracked listings mentioning "Snowflake", "dbt", or "data engineer" to spot companies transitioning to modern data warehouses. By reaching out within 48 hours, they identified 73 companies and boosted their qualified meeting rate from 12% to 34%, generating $1.2M in new pipeline value.
"The timing signal - active hiring for their exact use case - was invisible to standard enrichment tools".
Step 3: Score and Prioritize Leads
After enriching your leads, the next step is to figure out which ones deserve your sales team’s attention. Not every lead carries the same weight, so it’s essential to focus on those with the highest potential. Lead scoring and prioritization take the raw data you’ve collected and turn it into actionable insights, helping you identify and visualize prospects that show both strong buying intent and a good firmographic fit. This is where lead scoring becomes your secret weapon, ranking leads based on their likelihood to convert.
LeadBoxer’s scoring engine offers a fresh approach. Unlike traditional models, it recalculates lead scores in real time whenever you open a report, ensuring the most qualified leads are always at the top of the list. This dynamic system combines three key factors into a single prioritization score: behavioral engagement (what actions the lead takes), ICP fit (how well they align with your ideal customer profile), and persona matching (their role and seniority).
The system’s logic is built around four scoring criteria:
Range: Tracks visit frequency.
Match: Assesses how well the lead fits your firmographic parameters.
Exist: Verifies the accuracy of contact details.
Boost: Highlights critical actions that indicate strong interest.
Use LeadBoxer's Intent Scoring Features
LeadBoxer collects behavioral signals across multiple channels, such as website visits, email interactions, and form submissions, to fuel its scoring models. By identifying "buy signals" - like visits to pricing pages or documentation - the system goes beyond basic tracking to pinpoint real intent.
The scoring approach places more weight on what leads do rather than who they are. For example, a mid-market prospect who visits your pricing page multiple times, downloads a whitepaper, and opens your follow-up email is far more valuable than a Fortune 500 lead who only visits your homepage once. This focus on behavior makes the system particularly effective, as behavioral data often predicts conversions better than static firmographic information.
You can also fine-tune the scoring system to align with your goals. Adjust the importance of lead properties like industry, company name, or LinkedIn profile matches. For high-value pages, use wildcards (e.g., /plans/*) to capture and score interest across related URLs. Once your scoring is set up, configure notifications to alert your sales team when a lead crosses a key score threshold.
Customize Scoring Models
Once you’ve calibrated intent signals, you can refine your scoring model further by customizing thresholds to match your sales team’s capacity. Many businesses use a 100-point scale for clarity, with effective models typically incorporating 8-12 criteria. LeadBoxer’s API allows you to build logic around its four scoring parameters - Range, Match, Exist, and Boost - tailored to your business needs.
To fine-tune your model, start by analyzing your last 50-100 successful customers. Look for patterns in their behavior and attributes that set them apart from less valuable leads. For example, if your team can only handle 50 leads per week, adjust the scoring threshold so only the top 50 leads qualify.
Best practices include adding negative scoring for disqualifiers, such as personal email addresses or competitor domains, and implementing score decay to keep your pipeline fresh. For instance, you could subtract 5 points for every month of inactivity. Regularly review your scoring criteria with your sales and marketing teams to ensure the model reflects real-world results. This iterative process keeps your scoring system both accurate and actionable.
Scoring Category | Data Points to Include | LeadBoxer API Parameter |
|---|---|---|
Firmographic | Industry, Employee count, Revenue, Location | Match / Exist |
Demographic | Job title, Seniority level, Department | Match / Exist |
Behavioral | Pageviews, Pricing page visits, Email clicks | Range / Boost |
Negative | Personal email, Competitor domain, Student status | Match (with negative value) |
Step 4: Build Segmentation and Activation Workflows
Now that you’ve enriched and scored your leads in the earlier steps, it’s time to put that data to work. Segmentation takes all those insights - tracking, identification, and scoring - and organizes them into actionable, targeted audiences. From there, you can activate these leads effectively.
Create Segmented Lead Audiences
LeadBoxer simplifies segmentation by turning behavioral signals into usable lead segments. By combining behavioral engagement data with firmographic filters, you can create dynamic, highly specific audience groups. For instance:
Build a "high-intent enterprise" segment by targeting companies with 500+ employees that have visited your pricing page three or more times in the past week.
Identify "intent-surge accounts" by combining recent funding announcements with high levels of content engagement. B2B organizations have seen a 30–50% improvement in lead quality using these methods.
These segments update automatically as new data comes in, so you don’t have to worry about manually keeping them current.
To make your segmentation even more precise, layer multiple criteria like activity levels, ideal customer profile (ICP) fit, persona alignment, and custom events. You can even use wildcards (e.g., /plans/*) to include related pages in your criteria. Once your segments are set up, they can trigger real-time actions.
After defining your segments, the next step is to connect them with your existing sales and marketing tools for immediate action.
Connect to CRMs and Automation Tools
To act on your segmented data, integrate it with your CRM and automation platforms. LeadBoxer’s API-first design makes this process straightforward. Here’s how you can put it to work:
Webhooks: Use these for real-time triggers, like notifying your sales team as soon as a high-intent lead enters a segment.
Workflow automation tools: Platforms like Zapier, n8n, or Make allow you to create multi-step processes without needing to write code.
For example, when a lead meets your scoring threshold and enters a priority segment, you can automatically create an opportunity in Salesforce or HubSpot, complete with enriched data. This ensures your sales team has all the context they need without the hassle of manual data entry. Acting quickly is key - this integration helps your team reach out while the lead’s intent is still strong.
Imagine this: a lead enters your "high-intent enterprise" segment. Instantly, your marketing automation tool sends a personalized email sequence, LinkedIn ads targeting the account are triggered, and your account executive gets a task to follow up. This coordinated effort ensures consistent messaging across all channels. Start with simple workflows, then build in complexity as you figure out what works best. Don’t forget to include error handling and retry logic for critical API calls to maintain reliability, even if external services experience downtime.
Integration Method | Best For |
|---|---|
REST API | Custom dashboards, BI tools, and data lakes |
Webhooks | Real-time alerts and instant workflow triggers |
Workflow Tools (Zapier/n8n) | Connecting to CRMs and email automation without coding |
Tracking Script/SDK | Capturing website behavior and session stitching |
Step 5: Choose the Right Pricing Plan
Now that your lead generation system is up and running - from tracking to activation - it’s time to pick a pricing plan that aligns with your growth. LeadBoxer offers two flexible product lines to cater to businesses of all sizes and needs.
LeadBoxer Pricing Plans Overview
LeadBoxer provides two main solutions: the LeadBoxer App and the LeadBoxer Platform. Each is designed to meet different operational needs:
LeadBoxer App: A ready-to-use SaaS tool ideal for teams focused on identifying and qualifying leads. It’s available in several tiers:
Starter: Basic entry-level plan with essential features.
Basic: Geared toward small businesses, offering additional automation and collaboration tools.
Professional: Designed for medium-sized companies, featuring advanced CRM integrations and customizable management tools.
Enterprise: A tailored solution with premium support and exclusive features.
LeadBoxer Platform: Built for businesses that want to integrate lead intelligence into their own products. This operates on a credit-based model, letting you pay only for what you use. Credits cover features like behavioral tracking, IP-to-company lookups, data enrichment, ICP generation, and persona searches. Plus, email opens and clicks tracking is completely free. To get started, you receive 25,000 free credits to test your event flow and data quality before committing to a paid plan.
Once you’ve chosen the right plan, the pricing structure ensures your costs decrease as your usage scales.
Scale Efficiently with Volume-Based Pricing
The LeadBoxer Platform offers a pricing model that becomes more cost-effective as your usage grows. Here’s how it works:
After the initial 25,000 free credits, the cost is $0.0005 per credit for up to 1 million credits.
Between 1 million and 3 million credits, the rate drops to $0.0004 per credit.
For 3 million to 10 million credits, the cost decreases further to $0.0003 per credit.
Beyond 10 million credits, custom enterprise pricing is available.
This pricing approach offers a clear advantage: while building your own lead intelligence pipeline can take 6–12 months, LeadBoxer enables you to go to market in just days.
You can choose between two payment options:
Pay Per Use: No long-term commitment, with monthly billing based on the actual credits consumed.
Fixed Monthly Subscriptions: Ideal for businesses with predictable lead volumes or seasonal fluctuations.
To estimate your monthly credits, consider your website sessions and the number of new leads generated. Use the "Validate event flow" feature to monitor real-time behavior and enrichment activity before scaling. For SaaS providers integrating LeadBoxer, it’s recommended to create separate datasets for each customer to ensure accurate usage tracking and data isolation.
Conclusion
This guide covered how to effectively capture, qualify, and prioritize leads with ease. You can create a lead intelligence system in just a few days - no need for extra engineering or a dedicated data team. Unlike other lead identification software or custom-built solutions that take months, this approach lets you deploy quickly and efficiently.
Here's how it works: install the tracking script, use identification and enrichment APIs to qualify your leads, apply intent scoring, and connect everything to your CRM. LeadBoxer handles the heavy lifting - data ingestion, session stitching, and enrichment - so your team can focus on delivering product value.
You can get started with 25,000 free credits and only pay for what you use. With rates as low as $0.0003 per credit for higher volumes, it’s a budget-friendly option. Plus, email tracking is completely free, helping you avoid the steep infrastructure costs and staffing demands of building a system from scratch.
By using pre-built solutions like this, you skip the headaches of custom infrastructure while achieving real, measurable results. For B2B SaaS companies, this means faster time to market, better lead quality, and actionable insights. Whether you’re embedding lead intelligence into your product or empowering your sales team, the platform offers full API control and flexible integration options.
This system turns website traffic into actionable leads without straining your resources or backend operations.
FAQs
What should I track first to detect buying intent?
To identify buying intent, pay attention to engagement signals that indicate interest in your products or services. Look at behavioral data such as website visits, interactions with your content, and activity related to product research. On top of that, analyze firmographic and technographic data to spot prospects actively exploring or researching solutions. By leveraging these insights, you can prioritize leads more effectively and customize your outreach efforts.
How accurate is IP-to-company identification in practice?
IP-to-company identification delivers strong accuracy when paired with dependable IP intelligence and specialized databases. However, factors such as the quality of the data, shared IP usage, or the presence of VPNs can influence results. While it’s typically reliable, a small margin of error should be anticipated in some situations.
How do I set a lead score threshold my team can handle?
To create a lead score threshold your team can handle, start by identifying a cutoff point in your scoring model that aligns lead quality with your sales team's capacity. Look at historical data to pinpoint the score range where leads have successfully converted, then set your threshold just below that range. Keep in mind, this isn't a one-and-done process - regularly revisit and tweak the threshold as your team's capacity changes or as lead quality shifts. This ensures the threshold stays practical and effective over time.
Related Blog Posts

Supercharge your marketing results with LeadBoxer!
Analyze campaigns and traffic, segement by industry, drilldown on company size and filter by location. See your Top pages, top accounts, and many other metrics.


LeadBoxer
Get started